hanjm's blog


  • 首页

  • 标签

  • 归档

深入理解Prometheus(GO SDK及Grafana基本面板)

发表于 2019-10-06 |

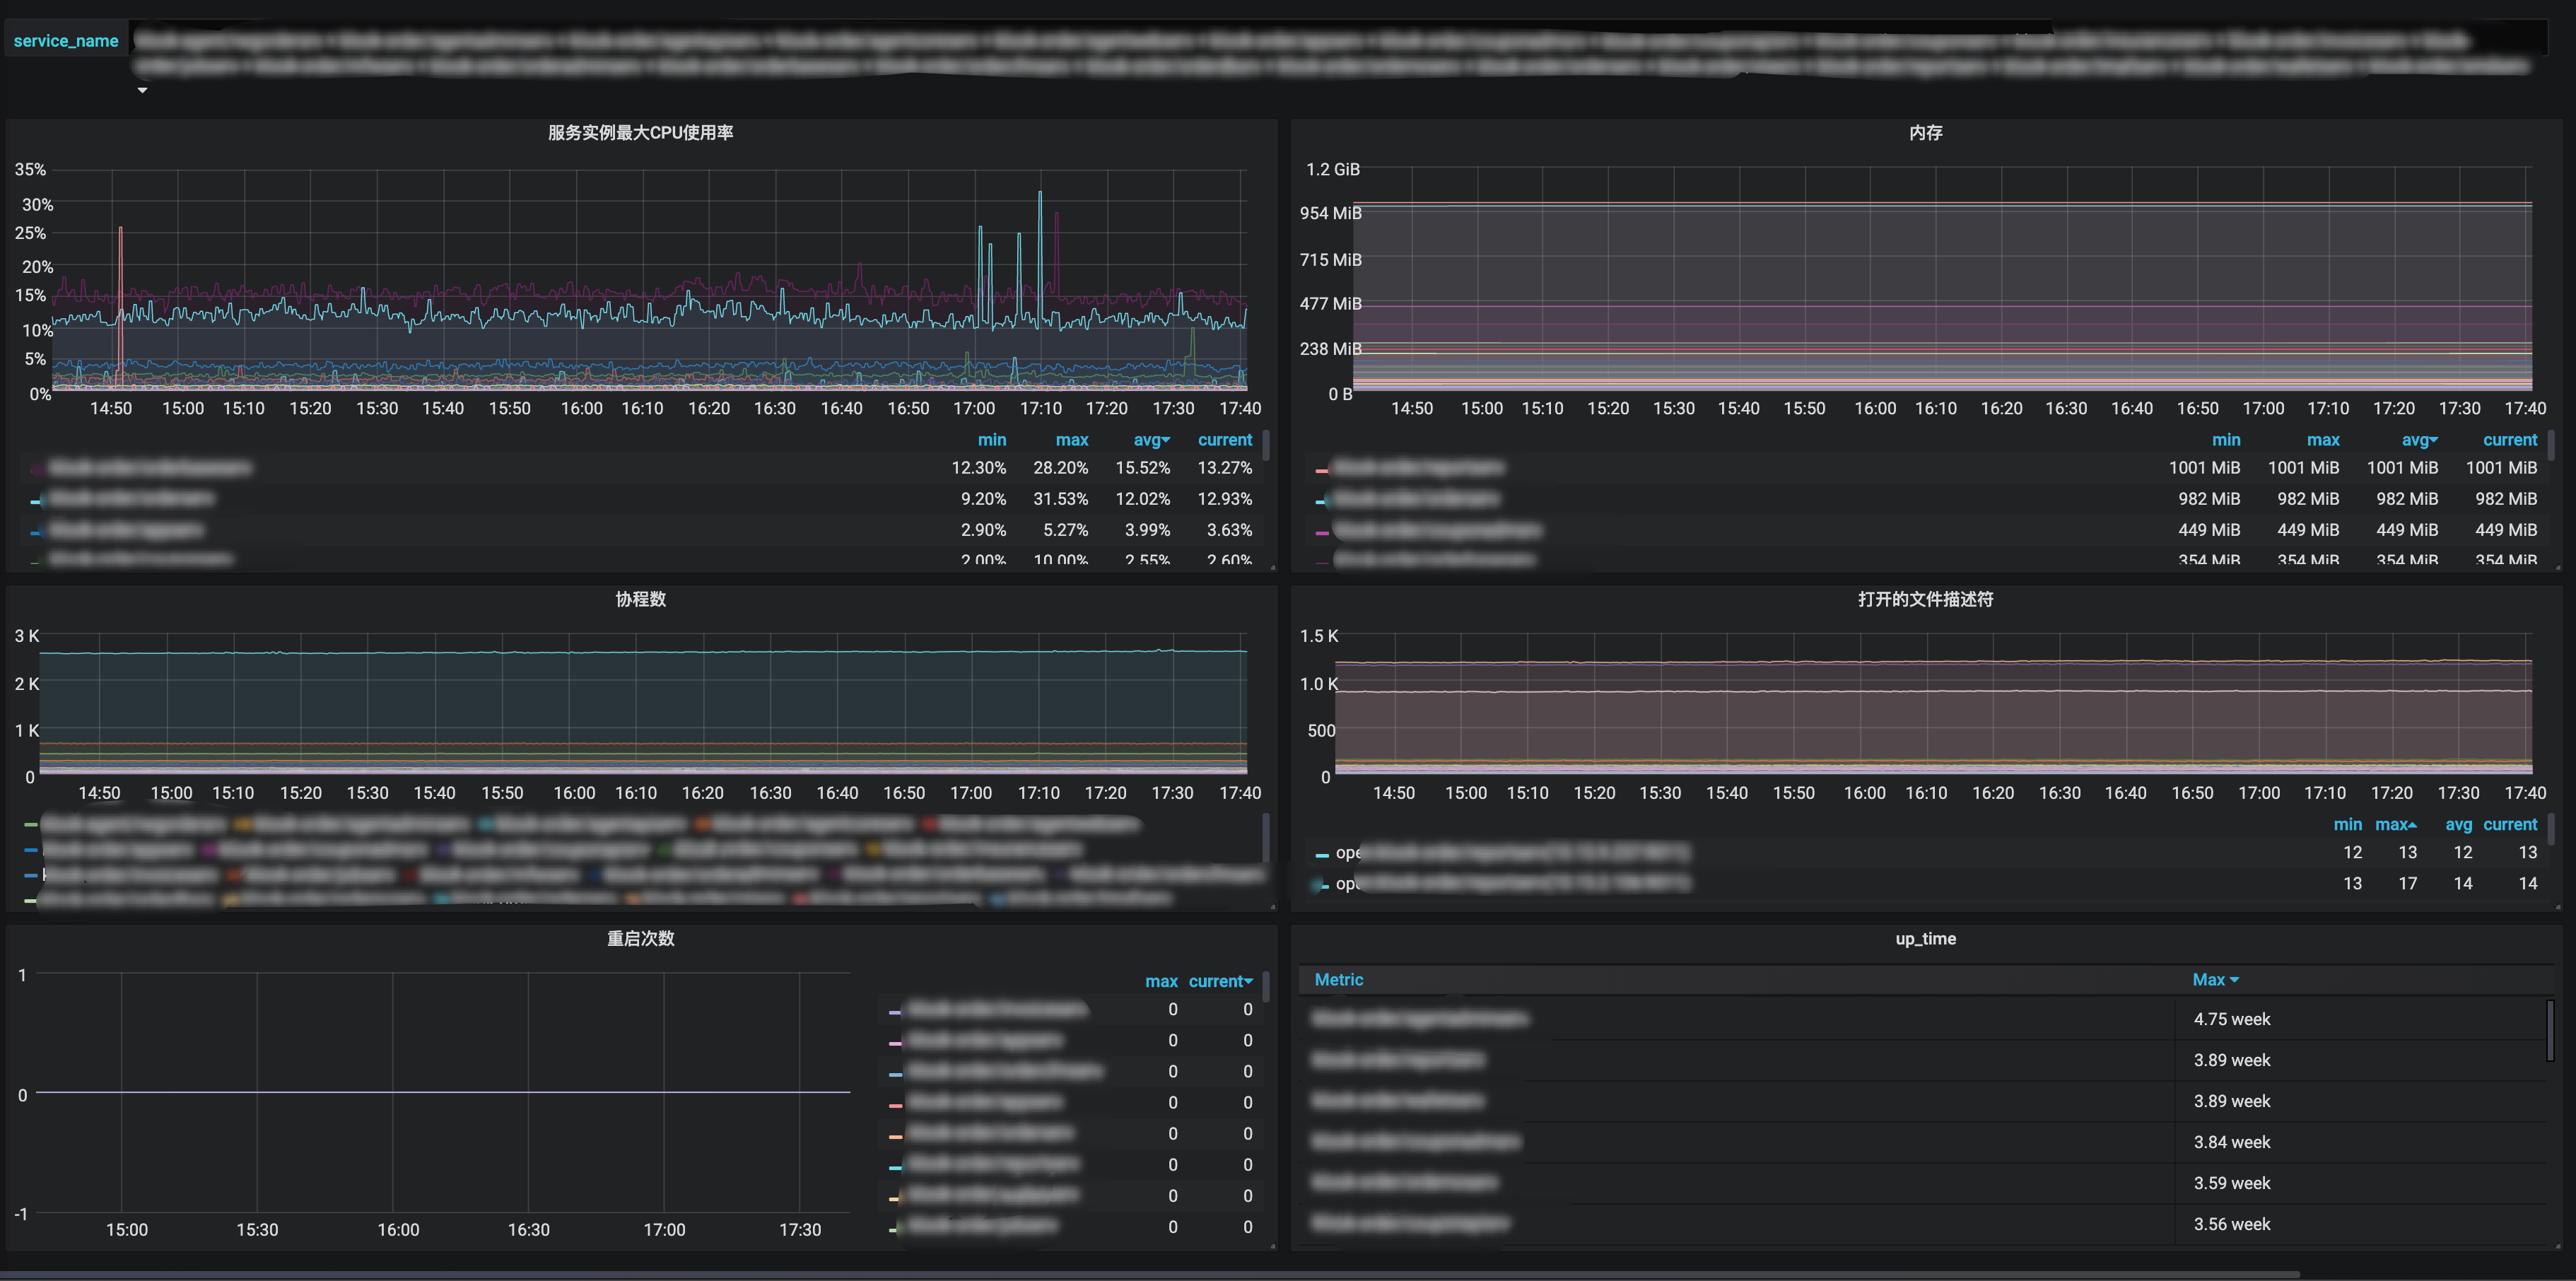
最近我对Prometheus刮目相看了, 服务加一行代码就能轻轻松松地监控起来服务的CPU使用率、内存、协程数、线程数、打开的文件描述符数量及软限制、重启次数等重要的基本指标, 配合Grafana建立了直观的图表, 对查问题很有帮助, 故想写写折腾Prometheus和Grafana后得到的值得一讲的实践与理解.

GO服务几个重要的基本指标Dashboard

介绍

Prometheus是CNCF 的项目之一(ps.CNCF的项目代码都值得研究), 而且还是Graduated Projects. 同时因为其主要是方便灵活的pull方式, 暴露出个http接口出来给prometheusd拉取就行了, 而push方式客户端要做更多的事情, 如果要改push的地址的话就很麻烦, 所以很多著名的项目都在用它, 比如k8s, tidb, etcd, 甚至是时序数据库influxdb都在用它.

我体会到, 很多场景很适合使用Prometheus sdk去加一些指标, 比如logger包, Error级别的消息数是一个很有用的指标; 对于消息队列的SDK, 可以用Prometheus收集客户端侧的发送时延、消费时延、消费处理耗时、消费处理出错等指标; 封装DB操作的SDK, 连接池打开的DB连接数与最大连接数是个很重要的指标; 写个HTTP Middleware, http handler的调用次数、处理时间和responseCode是感兴趣的指标.

安装

Prometheus是Go写的, 故部署方便且跨平台, 一个二进制文件加配置文件就能跑起来.

GitHub release页面有各个平台的编译好的二进制文件,通常配合supervisor等进程管理工具来服务化, 也可以用docker.

文档上有基础的配置文件示例, 复制为prometheus.yml即可.

./prometheus --config.file=prometheus.yml

prometheus.yml主要是定义一些全局的抓取间隔等参数以及抓取的job, 抓取的job可以指定名字、抓取间隔、抓取目标的IP端口号列表, 目标的路由路径, 额外的label等参数.

抓取指标时会自动加上job="<job_name>"和instance="<target ip port>"两个label, 如果想给job添加额外的固定label, 则可以在配置文件中按如下语法添加.

scrape_configs:
- job_name: foo
metrics_path: "/prometheus/metrics"
static_configs:
- targets: ['localhost:10056']
labels:
service_name: "bar"

服务发现

前面说到, Prometheus的配置文件主要就是定义要抓取的job配置, 显然新加服务要改配置文件是比较麻烦的, Prometheus的一大重要的功能点就是原生支持多种服务发现方式, 支持consul etcd等服务发现组件, 还支持非常通用的基于文件的服务发现, 即你可以定义一个写好target的IP端口号等配置的配置文件路径, 由外部程序定期去更新这个文件, prometheus会定期加载它, 更新抓取的目标, 非常灵活.

数据描述

Prometheus的时序指标数据由timestamp、metric name、label、value组成:

  • timestamp是毫秒级的时间戳.

  • metric name是符合正则[a-zA-Z_:][a-zA-Z0-9_:]*的字符串, 即只包含英文字母和数字及两个特殊符号_:, 不能包含横杆-这样的特殊符号.

  • label是一个kv都是string类型的map.

  • value是float64.

指标类型

Prometheus的指标类型包括基本指标类型Counter和Guage及进阶指标类型Historygram和Summary.

所有指标都是在client SDK端内存存储的, 由prometheus抓取器抓取.

Counter

Counter是计数器, 单调递增的, 只有服务重启时才会清零, 比如http请求数, errorLevel的log数. 值得一提的是, prometheus的内置函数求值时会自动处理重启清零的情况.

counter的value是float64, 怎么无锁地操作float64呢? 答案是用math包将其视作uint64来操作.

func (v *value) Add(val float64) {
for {
oldBits := atomic.LoadUint64(&v.valBits)
newBits := math.Float64bits(math.Float64frombits(oldBits) + val)
if atomic.CompareAndSwapUint64(&v.valBits, oldBits, newBits) {
return
}
}
}

Guage

Guage是一个可增可减的数值指标, 比如CPU使用率, 内存使用率, 协程数.

Historygram

Historygram是直方图, 适合需要知道数值分布范围的场景, 比如http请求的响应时长, http请求的响应包体大小等.

直方图的组距不一定是固定的, 可以自己定义适合, 这里称其为bucket, 每一个metric value根据其数值大小落在对应的bucket.

Historygram实际上包含多个时序数据.

  • <basename>_bucket{le="<upper inclusive bound>"}小于等于指定数值的计数.
  • <basename>_sum 总和
  • <basename>_count 总计数, 其值当然也等于<basename>_bucket{le="+Inf"}

Summary

Summary相比Historygram是按百分位聚合好的直方图, 适合需要知道百分比分布范围的场景, 比如对于 http请求的响应时长, Historygram是侧重在于统计小于1ms的请求有多少个, 1ms~10ms的请求有多少个, 10ms以上的请求有多少个, 而Summary在于统计20%的请求的响应时间是多少, 50%的请求的响应时间是多少, 99%的请求的响应时间是多少. Historygram是计数原始数据, 开销小, 执行查询时有对应的函数计算得到p50, p99, 而Summary是在客户端SDK测做了聚合计算得到指定的百分位, 开销更大一些.

SDK的使用

prometheus的Golang SDK设计得很地道, 充分利用了GO语言的特性.

在SDK中所有的指标类型都实现了prometheus.Collector 接口.

// Collector is the interface implemented by anything that can be used by
// Prometheus to collect metrics. A Collector has to be registered for
// collection. See Registerer.Register.
//
// The stock metrics provided by this package (Gauge, Counter, Summary,
// Histogram, Untyped) are also Collectors (which only ever collect one metric,
// namely itself). An implementer of Collector may, however, collect multiple
// metrics in a coordinated fashion and/or create metrics on the fly. Examples
// for collectors already implemented in this library are the metric vectors
// (i.e. collection of multiple instances of the same Metric but with different
// label values) like GaugeVec or SummaryVec, and the ExpvarCollector.
type Collector interface {
// Describe sends the super-set of all possible descriptors of metrics
// collected by this Collector to the provided channel and returns once
// the last descriptor has been sent. The sent descriptors fulfill the
// consistency and uniqueness requirements described in the Desc
// documentation. (It is valid if one and the same Collector sends
// duplicate descriptors. Those duplicates are simply ignored. However,
// two different Collectors must not send duplicate descriptors.) This
// method idempotently sends the same descriptors throughout the
// lifetime of the Collector. If a Collector encounters an error while
// executing this method, it must send an invalid descriptor (created
// with NewInvalidDesc) to signal the error to the registry.
Describe(chan<- *Desc)
// Collect is called by the Prometheus registry when collecting
// metrics. The implementation sends each collected metric via the
// provided channel and returns once the last metric has been sent. The
// descriptor of each sent metric is one of those returned by
// Describe. Returned metrics that share the same descriptor must differ
// in their variable label values. This method may be called
// concurrently and must therefore be implemented in a concurrency safe
// way. Blocking occurs at the expense of total performance of rendering
// all registered metrics. Ideally, Collector implementations support
// concurrent readers.
Collect(chan<- Metric)
}

prometheus.Collector 接口中的方法传参都是只写的chan, 使得实现接口的代码无论是同步还是并行都可以. Describe(chan<- *Desc)方法是在将Collector注册或注销时调用的, Collect(chan<- Metric)方法是在被抓取收集指标时调用的.

基本使用

不带label的指标类型使用prometheus.NewCounter prometheus.NewGauge prometheus.NewHistogram prometheus.NewSummary去创建并使用prometheus.MustRegister 注册, 一般是初始化好作为一个包内全局变量, 在init函数中注册.

var (
sentBytes = prometheus.NewCounter(prometheus.CounterOpts{
Namespace: "etcd",
Subsystem: "network",
Name: "client_grpc_sent_bytes_total",
Help: "The total number of bytes sent to grpc clients.",
})

receivedBytes = prometheus.NewCounter(prometheus.CounterOpts{
Namespace: "etcd",
Subsystem: "network",
Name: "client_grpc_received_bytes_total",
Help: "The total number of bytes received from grpc clients.",
})
)

func init() {
prometheus.MustRegister(sentBytes)
prometheus.MustRegister(receivedBytes)
}

counter的Add方法不能传负数, 否则会panic.

带label的指标类型使用prometheus.NewCounterVec prometheus.NewGaugeVec prometheus.NewHistogramVec prometheus.NewSummaryVec, 不同的label值就像空间直角坐标系中的以原点为七点的不同方向的向量一样.

调用Vec类型的WithLabelValues方法传入的value参数数量一定要和注册时定义的label数量一致, 否则会panic.

进阶使用

默认情况下, Collector都是主动去计数, 但有的指标无法主动计数, 比如监控服务当前打开的DB连接数, 这个指标更适合在拉取指标时去获取值, 这个时候就可以使用prometheus.NewCounterFunc prometheus.NewGaugeFunc, 传入一个返回指标值的函数func() float64, 在拉取指标时就会调用这个函数, 当然, 这样定义的是没有带Label的, 如果想在拉取指标时执行自己定义的函数并且附加上label, 就只能自己定义一个实现 prometheus.Collector接口的指标收集器, prometheus SDK设计得足够灵活, 暴露了底层方法MustNewConstMetric, 使得可以很方便地实现一个这样的自定义Collector, 代码如下.

type gaugeVecFuncCollector struct {
desc *prometheus.Desc
gaugeVecFuncWithLabelValues []gaugeVecFuncWithLabelValues
labelsDeduplicatedMap map[string]bool
}

// NewGaugeVecFunc
func NewGaugeVecFunc(opts GaugeOpts, labelNames []string) *gaugeVecFuncCollector {
return &gaugeVecFuncCollector{
desc: prometheus.NewDesc(
prometheus.BuildFQName(opts.Namespace, opts.Subsystem, opts.Name),
opts.Help,
labelNames,
opts.ConstLabels,
),
labelsDeduplicatedMap: make(map[string]bool),
}
}

// Describe
func (dc *gaugeVecFuncCollector) Describe(ch chan<- *prometheus.Desc) {
ch <- dc.desc
}

// Collect
func (dc *gaugeVecFuncCollector) Collect(ch chan<- prometheus.Metric) {
for _, v := range dc.gaugeVecFuncWithLabelValues {
ch <- prometheus.MustNewConstMetric(dc.desc, prometheus.GaugeValue, v.gaugeVecFunc(), v.labelValues...)
}
}

// RegisterGaugeVecFunc
// 同一组labelValues只能注册一次
func (dc *gaugeVecFuncCollector) RegisterGaugeVecFunc(labelValues []string, gaugeVecFunc func() float64) (err error) {
// prometheus每次允许收集一次labelValues相同的metric
deduplicateKey := strings.Join(labelValues, "")
if dc.labelsDeduplicatedMap[deduplicateKey] {
return fmt.Errorf("labelValues func already registered, labelValues:%v", labelValues)
}
dc.labelsDeduplicatedMap[deduplicateKey] = true
handlePanicGaugeVecFunc := func() float64 {
if rec := recover(); rec != nil {
const size = 10 * 1024
buf := make([]byte, size)
buf = buf[:runtime.Stack(buf, false)]
logger.Errorf("gaugeVecFunc panic:%v\nstack:%s", rec, buf)
}
return gaugeVecFunc()
}
dc.gaugeVecFuncWithLabelValues = append(dc.gaugeVecFuncWithLabelValues, gaugeVecFuncWithLabelValues{
gaugeVecFunc: handlePanicGaugeVecFunc,
labelValues: labelValues,
})
return nil
}

最佳实践

  1. 在编辑图表写查询语句时,不会显示指标类型, 所以最好看到metric name就能知道是一个什么类型的指标, 约定counter类型的指标名字以_total为后缀.

  2. 在编辑图表写查询语句时, 也不会显示指标类型的单位, 所以最好看到metric name就能知道是一个什么单位的指标, 比如时长要写是纳秒还是毫秒还是秒, http_request_duration_seconds, 数据大小要写是MB还是bytes, client_grpc_sent_bytes_total.

  3. 每个指标要有单个词的namespace前缀, 比如process_cpu_seconds_total, http_request_duration_seconds.

  4. 不带label的Counter和Guage内部是个无锁的atomic uint64, 不带Label的Historygram内部是多个无锁的atomic uint64, 不带Label的Summary因为内部要聚合计算, 是有锁的, 所以并发要求高的话优先选择Historygram而不是Summary.

  5. 带label的每次会去计算label值的hash找到对应的向量, 然后去计数, 所以label数不要太多, label值的长度不要太长, label值是要可枚举的并且不能太多, 否则执行查询时慢, 面板加载慢, 存储也费空间. label如果可以提前计算则尽量使用GetMetricWithLabelValues提前计算好得到一个普通的计数器, 减少每次计数的一次计算label的hash, 提升程序性能.

    // GetMetricWithLabelValues replaces the method of the same name in
    // MetricVec. The difference is that this method returns a Counter and not a
    // Metric so that no type conversion is required.
    func (m *CounterVec) GetMetricWithLabelValues(lvs ...string) (Counter, error) {
    metric, err := m.MetricVec.GetMetricWithLabelValues(lvs...)
    if metric != nil {
    return metric.(Counter), err
    }
    return nil, err
    }
  6. 对于时长time.Duration数据类型的指标值收集, time.Since是优化过的, 直接走runtimeNano, 无需走系统调用取当前时间, 性能优于time.Now后相减, 另外, 频繁调用time.Now在性能要求高的程序中也会变成不小的开销.

查询语句promQL

Prometheus查询语句(PromQL)是一个相比SQL更简单也很有表达力的专用查询语言, 通过文档及例子学习.

Prometheus自带的Graph面板比较简陋, 一般情况下直接用强大的Grafana就行了, 制作图表dashboard时, 直接输入PromQL即可展示时序图表.

label条件 (Instant vector selectors)

http_requests_total{job="prometheus",group="canary"}

查询条件中,除了=和!=外, =~表示正则匹配, !~表示正则不匹配.

查询条件也可以作用在metric name上, 语法有点像Python的__前缀的魔法, 如用 {__name__=~"job:.*"}表示选择名字符合job:.*这样的正则的metric.

范围条件(Range Vector Selectors)

http_requests_total{job="prometheus"}[5m]

范围条件中, 时长字符串语法和GO一样, s代表秒, m代表分, h代表小时, d代表天, w代表星期, y代表年.

常用函数

  1. changes() 变化次数
  2. delta(v range-vector) 平均变化量, 只适用于guage
  3. idelta(v range-vector) 即时变化量, 只适用于guage
  4. histogram_quantile(φ float, b instant-vector) histogram专用函数, 用来计算p99 p90等百分位的summary. 例子histogram_quantile(0.9, avg(rate(http_request_duration_seconds_bucket[10m])) by (job, le))
  5. increase(v range-vector) 增量, 只适用于counter
  6. rate - 平均QPS
  7. irate - 即时QPS, 如果原始数据变化快, 可以使用更敏感的irate

Snippet

这里列举一些我通过搜索及自行摸索出来的对于Prometheus GO SDK默认收集的指标的PromQL Snippet.

  1. CPU使用率: rate(process_cpu_seconds_total[1m])* 100

  2. 系统内存使用率: go_memstats_sys_bytes

  3. 重启次数: changes(process_start_time_seconds[5m])

Grafana面板

编辑Grafana面板时, 有几个技巧:

  1. Query界面可以设置下方说明条Legend的格式, 支持双花括号形式的模板语法, 此处的值在发报警时会作为报警消息内容的一部分.
  2. Visualization界面可以设置坐标轴的单位, 比如百分比, 数据大小单位, 时长单位等等, 让Y轴的值更具有可读性.
  3. Visualization界面可以设置Legend的更多选项, 是否显示为一个表格, 表格是放在下方还是右方, 支持显示额外的聚合值如最大值最小值平均值当前值总值, 支持设置这些聚合值的小数位数.

监控告警

告警在Grafana处可视化界面设置会比较简单, 可设置连续多少次指定的promQL查出的值不在指定的范围即触发报警, 告警通知的最佳搭配当然是slack channel.

深入理解ActiveMQ消息队列协议STMOP AMQP MQTT

发表于 2019-02-07 |

前言

AWS MQ是完全托管的 ActiveMQ 服务, 最近需要使用, 于是学习其文档, 实践其特性, 由于 ActiveMQ 支持非常丰富的协议, OpenWire amqp stomp mqtt, 所以也学习了各大协议的特性及其SDK.

安装

本地开发最方便的方式当然是docker了, rmohr/activemq 文档比较好的且有aws支持的5.15.6版本的tag.

需要注意的是, 首先要根据其docker hub镜像文档上的几步操作, 将镜像中的默认配置文件复制到自定义的本机conf目录下 /usr/local/activemq/conf, 然后就快速地启动了一个默认配置的 ActiveMQ server

# active mq
docker run -itd --name activemq \
-p 61616:61616 -p 8161:8161 -p 5672:5672 -p 61613:61613 -p 1883:1883 -p 61614:61614 \
-v /usr/local/activemq/conf:/opt/activemq/conf \
-v /usr/local/activemq/data:/opt/activemq/data \
rmohr/activemq:5.15.6

特性

Advisory

ActiveMQ可以将本身的一些事件投递到系统的消息队列, 如 queue/topic的创建, 没有消费者的queue/topic等. http://activemq.apache.org/advisory-message.html

这个特性对于监控MQ非常有用, 默认配置时关闭的, 需要在配置文件activemq.xml中打开.

Wildcards

通配符

. 用于分割名字中的多个单词
* 表示任一名字, 不包括点号(.)
> 表示任一名字, 包括点号(.), 用于表示前缀, >符号后面不会再跟其他限制条件.

通配符可以用在配置文件中表名作用范围, 也可以用于订阅时的destination名字, 这个功能很不错.

Virtual Topic

所谓virtual topic 就是将一个正常的topic, 变成了多个queue. 如TopicA启用了Virtual topic, 则consumer可以去消费 Consumer.xxx.TopicA 这样模式的queue的消息. (http://activemq.apache.org/virtual-destinations.html)

xxx对应类似NSQ中的Channel概念.

需要在activemq.xml中配置virtualDestinationInterceptor的范围 prefix及其他选项.

  • name=">" 表示所有的topic都启用virtualTopic功能.

  • prefix="Consumer.*." 表示可以订阅的virtualTopic的pattern是Consumer..

<destinationInterceptors> 
<virtualDestinationInterceptor>
<virtualDestinations>
<virtualTopic name=">" prefix="Consumer.*." selectorAware="false"/>
</virtualDestinations>
</virtualDestinationInterceptor>
</destinationInterceptors>

Delay & Schedule

ActiveMQ支持延时消息及定时消息, 在message header中带上如下字段即可, 其中AMQ_SCHEDULED_PERIOD的最大值是long的最大值, 所以可以设置延时很长时间.

Property name type description
AMQ_SCHEDULED_DELAY long The time in milliseconds that a message will wait before being scheduled to be delivered by the broker
AMQ_SCHEDULED_PERIOD long The time in milliseconds to wait after the start time to wait before scheduling the message again
AMQ_SCHEDULED_REPEAT int The number of times to repeat scheduling a message for delivery
AMQ_SCHEDULED_CRON String Use a Cron entry to set the schedule

Dead Letter Queue

如果broker投递给消费者消息, 没有ACK或NACK, 则会触发重新投递, 投递超过一定次数则会进入死信队列, 默认只有一个公共的死信队列ActiveMQ.DLQ, 如果需要给topic分别设置死信队列, 则要在修改activemq.xml.

<broker>
   
  <destinationPolicy>
    <policyMap>
      <policyEntries>
        <!-- Set the following policy on all queues using the '>' wildcard -->
        <policyEntry queue=">">
          <deadLetterStrategy>
            <!--
              Use the prefix 'DLQ.' for the destination name, and make
              the DLQ a queue rather than a topic
            -->
            <individualDeadLetterStrategy queuePrefix="DLQ." useQueueForQueueMessages="true"/>
          </deadLetterStrategy>
        </policyEntry>
      </policyEntries>
    </policyMap>
  </destinationPolicy>
</broker>

默认非持久化的topic不会进入到死信队列中, 如果需要, 则修改activemq.xml, 加入

<!-- 
Tell the dead letter strategy to also place non-persisted messages
onto the dead-letter queue if they can't be delivered.
-->
<deadLetterStrategy>
<... processNonPersistent="true" />
</deadLetterStrategy>

实践

STOMP

STOMP是Simple (or Streaming) Text Orientated Messaging Protocol 的缩写, 设计思路借鉴了HTTP, 有content-type, header, body, frame based, text based等类似HTTP的相关概念, 设计文档 < https://stomp.github.io/stomp-specification-1.2.html>, 非常得简洁, 一页就讲完了.

协议细节及特点:

  1. 对于重复的header key, 只有第一个有效.
  2. 服务端可以限制消息大小, header field数量, header长度.
  3. 一个client开多个subscriber时, 必须设置subscribe id.
  4. NACK command 表示 requeue.
  5. stomp有事务的概念, 消息从producer发出到broker确认收到算一个事务, broker投递到consumer ACK算一个事务, 事务具有原子性.
  6. 支持SSL.

ActiveMQ作为STOMP server

  1. 支持 v1.1版本的STMOP协议.

  2. 默认最大消息长度 maxDataLength 为 104857600, maxFrameSize 为 MAX_LONG.

  3. 通过 destination 名字前缀是/queue/ 还是 /topic/ 来区分是 queue (生产消费模型)还是 topic(发布订阅模型). 真正的名字是去掉包括两个/符号的前缀后的.

  4. 发送默认不是持久化的, 需要在SEND时手动指定persistent:true的header以开启持久化.

    订阅默认不是持久化的, 需要在SUBSCRIBE时手动指定activemq.subscriptionName:订阅者名字的header来开启持久化订阅.

    很多特性都是靠STOMP header来处理的, ActiveMQ官方文档上有两节讲STOMP的header. http://activemq.apache.org/stomp.html#Stomp-StompExtensionsforJMSMessageSemantics

SDK

https://github.com/go-stomp/stomp 是目前star数最高的

  1. 提了个PR https://github.com/go-stomp/stomp/pull/58
  2. 解决了个issue https://github.com/go-stomp/stomp/issues/47

demo 代码

package main

import (
"context"
"github.com/go-stomp/stomp"
"github.com/hanjm/log"
"os"
"os/signal"
"strconv"
"sync"
"syscall"
"time"
)

func main() {
var wg sync.WaitGroup
ctx, cancel := context.WithCancel(context.Background())

wg.Add(1)
go func() {
defer wg.Done()
publisher(ctx, "/topic/stomp")
}()

wg.Add(1)
go func() {
defer wg.Done()
Subscriber(ctx, "channel1", "Consumer.channel1.stomp")
}()
//
wg.Add(1)
go func() {
defer wg.Done()
Subscriber(ctx, "channel2", "Consumer.channel2.stomp")
}()

wg.Add(1)
go func() {
defer wg.Done()
Subscriber(ctx, "channel3", "/topic/stomp")
}()

defer func() {
cancel()
wg.Wait()
}()
SignalsListen()
}

func publisher(ctx context.Context, destination string) {
conn, err := stomp.Dial("tcp", "127.0.0.1:61613")
if err != nil {
log.Fatal(err)
return
}
defer conn.Disconnect()
for i := 0; ; i++ {
select {
case <-ctx.Done():
return
case <-time.After(time.Second):
err = conn.Send(
destination, // destination
"text/plain", // content-type
[]byte("Test message #"+strconv.Itoa(i)), stomp.SendOpt.Header("persistent", "true")) // body
if err != nil {
log.Error(err)
return
}
}
}
}

func Subscriber(ctx context.Context, clientID string, destination string) {
conn, err := stomp.Dial("tcp", "127.0.0.1:61613")
if err != nil {
log.Fatal(err)
return
}
defer conn.Disconnect()
sub, err := conn.Subscribe(destination, stomp.AckClientIndividual, stomp.SubscribeOpt.Id(clientID), stomp.SubscribeOpt.Header("persistent", "true"))
if err != nil {
log.Fatal(err)
return
}
go func() {
select {
case <-ctx.Done():
err := sub.Unsubscribe()
if err != nil {
log.Fatal(clientID, err)
return
}
return
}
}()
for m := range sub.C {
if m.Err != nil {
log.Fatal(err)
return
}
log.Infof("%s msg body:%s", clientID, m.Body)
//log.Infof("%s msg header:%s", clientID, *m.Header)
//log.Infof("%s msg content-type:%s", clientID, m.ContentType)
//log.Infof("%s msg destination:%s", clientID, m.Destination)
m.Conn.Ack(m)
}
log.Info("close sub")
}

func SignalsListen() {
sigs := make(chan os.Signal, 1)
signal.Notify(sigs, syscall.SIGQUIT,
syscall.SIGTERM,
syscall.SIGINT,
syscall.SIGUSR1,
syscall.SIGUSR2)

switch <-sigs {
case syscall.SIGTERM, syscall.SIGINT, syscall.SIGQUIT:
log.Info("service close")
}
return
}

MQTT

协议文档http://docs.oasis-open.org/mqtt/mqtt/v3.1.1/os/mqtt-v3.1.1-os.html

翻译版文档https://mcxiaoke.gitbooks.io/mqtt-cn/content/mqtt/01-Introduction.html

协议细节及特点:

  1. transport支持TCP, 也支持WebSocket, 所以定位于IOT.
  2. 不支持生产消费模型, 只支持发布订阅模型.
  3. 用QOS来表示消息队列中的投递语义, QOS=0 表示至多发送一次, QOS=1表示至少发送一次, QOS=2表示精确地只发送一次.

ActiveMQ作为MQTT server

  1. 通配符不同, MQTT的 / + # 分别对应 ActiveMQ的. * >.
  2. QOS=0对应的是非持久化的topic, QOS=1或者QOS=2对应持久化的topic.

AMQP

协议文档: http://docs.oasis-open.org/amqp/core/v1.0/os/amqp-core-overview-v1.0-os.html

AMQP相比 stomp mqtt 就复杂得多, 毕竟名字就是高级消息队列(Advanced Message Queuing Protocol ).

协议细节及特点:

  1. AMQP有很多不同的概念, 如Link, Container, Node. 不看模型文档的话就直接使用SDK的话会比较费劲. ContainerID对应ActiveMQ client ID, LinkName对应ActiveMQ subscription name.

ActiveMQ作为AMQP server

  1. 使用1.0协议, 所以使用了0.9.1的2k star的sdk不能用.(https://github.com/streadway/amqp), 而且官方也认为没必要支持旧版本的协议.
  2. 默认最大消息长度 maxDataLength 为 104857600(100MB), maxFrameSize 为 MAX_LONG, consumer持有的未确认最大消息数量prefetch为1000, producerCredit为10000. 可通过连接的URI设定.
  3. 支持SSL.
  4. 通过 destination 名字前缀是queue:// 还是 topic:// 来区分是 queue (生产消费模型)还是 topic(发布订阅模型). 真正的名字是去掉包括两个/符号的前缀后的.

性能

分别使用

github.com/vcabbage/amqp 76star 13issue 5contributors
github.com/go-stomp/stomp 132star 3issue 14contributors
github.com/eclipse/paho.mqtt.golang 650star 20issue 34contributors

作为SDK, 分别测试了下pub sub 1KB大小的消息普通场景.

publish性能上, amqp=stomp>mqtt, amqp和stomp差不多, 是mqtt的两倍多.
subscribe性能上, amqp比stomp快一点, mqtt则慢很多.

benchmark代码

package all_bench

import (
"bytes"
"context"
"github.com/eclipse/paho.mqtt.golang"
"github.com/go-stomp/stomp"
"github.com/hanjm/log"
"pack.ag/amqp"
"sync/atomic"
"testing"
"time"
)

var msgData = bytes.Repeat([]byte("1"), 1024)

var (
stompDestination = "bench-stomp"
amqpDestination = "bench-amqp"
mqttDestination = "bench-mqtt"
pubMsgCount = 20000
subMsgCount = 100
)

func TestMain(m *testing.M) {
m.Run()
}

// go test -bench Publish -benchmem
// go test -bench Sub -benchmem
func BenchmarkStompPublish(b *testing.B) {
conn, err := stomp.Dial("tcp", "127.0.0.1:61613")
if err != nil {
log.Fatal(err)
return
}
defer conn.Disconnect()

b.N = pubMsgCount
b.ReportAllocs()
b.ResetTimer()

for i := 0; i < b.N; i++ {
err = conn.Send(
stompDestination, // destination
"text/plain", // content-type
msgData) // body
if err != nil {
log.Error(err)
return
}
}
}

func BenchmarkAmqpPublish(b *testing.B) {
// Create client
client, err := amqp.Dial("amqp://127.0.0.1",
amqp.ConnSASLPlain("system", "manager"),
)
if err != nil {
log.Fatal("Dialing AMQP server:", err)
}
defer client.Close()

// Open a session
session, err := client.NewSession()
if err != nil {
log.Fatal("Creating AMQP session:", err)
}
defer func() {
ctx, cancel := context.WithTimeout(context.Background(), 10*time.Second)
defer cancel()
err = session.Close(ctx)
if err != nil {
log.Errorf("failed to close session:%s", err)
return
}
//log.Info("session close")
}()

// Create a sender
sender, err := session.NewSender(
amqp.LinkTargetAddress(amqpDestination),
amqp.LinkSourceDurability(amqp.DurabilityUnsettledState),
amqp.LinkSourceExpiryPolicy(amqp.ExpiryNever),
)
if err != nil {
log.Fatal("Creating sender link:", err)
}

defer func() {
ctx, cancel := context.WithTimeout(context.Background(), 10*time.Second)
defer cancel()
err := sender.Close(ctx)
if err != nil {
log.Errorf("failed to close sender:%s", err)
return
}
//log.Infof("sender close")
}()

ctx := context.Background()
msg := amqp.NewMessage(msgData)

b.N = pubMsgCount
b.ReportAllocs()
b.ResetTimer()

for i := 0; i < b.N; i++ {
// Send message
err = sender.Send(ctx, msg)
if err != nil {
log.Fatal("Sending message:", err)
}
if err != nil {
log.Fatal(err)
return
}
}
}

func BenchmarkMqttPublish(b *testing.B) {
opt := mqtt.NewClientOptions().SetClientID("pubClient").SetCleanSession(false)
opt.AddBroker("tcp://127.0.0.1:1883")
client := mqtt.NewClient(opt)
t := client.Connect()
err := t.Error()
if err != nil {
log.Fatal(err)
return
}
if t.Wait() {
err := t.Error()
if err != nil {
log.Fatal(err)
return
}
}
defer func() {
client.Disconnect(10000)
}()

b.N = pubMsgCount
b.ReportAllocs()
b.ResetTimer()

for i := 0; i < b.N; i++ {
token := client.Publish(mqttDestination, 2, true, msgData)
err := token.Error()
if err != nil {
log.Fatal(err)
return
}
}
}

func BenchmarkStompSubscriber(b *testing.B) {
conn, err := stomp.Dial("tcp", "127.0.0.1:61613")
if err != nil {
log.Fatal(err)
return
}
clientID := "1"
//defer conn.Disconnect()
sub, err := conn.Subscribe(stompDestination, stomp.AckClientIndividual, stomp.SubscribeOpt.Id(clientID))
if err != nil {
log.Fatal(err)
return
}
//defer func() {
// err := sub.Unsubscribe()
// if err != nil {
// log.Fatal(clientID, err)
// return
// }
// return
//}()
ctx, cancel := context.WithTimeout(context.Background(), 100*time.Second)
defer cancel()

b.N = subMsgCount
b.ReportAllocs()
b.ResetTimer()
defer b.StopTimer()
var i int64 = 0

go func() {
for range time.Tick(time.Second) {
if atomic.LoadInt64(&i) >= int64(b.N) {
cancel()
}
}
}()

defer func() {
//log.Info("close")
}()
for {
select {
case m := <-sub.C:
if m.Err != nil {
log.Fatal(m.Err)
return
}
m.Conn.Ack(m)
i++
if atomic.LoadInt64(&i) > int64(b.N) {
return
}
case <-ctx.Done():
return
}
}
}

func BenchmarkAmqpSubscriber(b *testing.B) {
// Create client
client, err := amqp.Dial("amqp://127.0.0.1",
amqp.ConnSASLPlain("system", "manager"),
)
if err != nil {
log.Fatal("Dialing AMQP server:", err)
}
//defer client.Close()

// Open a session
session, err := client.NewSession()
if err != nil {
log.Fatal("Creating AMQP session:", err)
}

clientID := "1"
defer func() {
ctx, cancel := context.WithTimeout(context.Background(), 10*time.Second)
defer cancel()
err := session.Close(ctx)
if err != nil {
log.Errorf("%s failed to close session:%s", clientID, err)
return
}
//log.Errorf("%s session close", clientID)
}()

// Continuously read messages
// Create a receiver
receiver, err := session.NewReceiver(
amqp.LinkSourceAddress(amqpDestination),
amqp.LinkCredit(10),
)
if err != nil {
log.Fatal("Creating receiver link:", err)
}
defer func() {
ctx, cancel := context.WithTimeout(context.Background(), 10*time.Second)
defer cancel()
err := receiver.Close(ctx)
if err != nil {
log.Errorf("%s failed to close receiver:%s", clientID, err)
return
}
//log.Errorf("%s receiver close", clientID)
}()
ctx, cancel := context.WithTimeout(context.Background(), 100*time.Second)
defer cancel()

b.N = subMsgCount
b.ReportAllocs()
b.ResetTimer()
defer b.StopTimer()
var i int64 = 0

go func() {
for range time.Tick(time.Second) {
if atomic.LoadInt64(&i) >= int64(b.N) {
cancel()
}
}
}()
for {
// Receive next message
msg, err := receiver.Receive(ctx)
if err != nil {
if err == context.Canceled {
log.Infof("Reading message from AMQP:%s", err)
break
}
log.Errorf("Reading message from AMQP:%s", err)
break
}
//log.Infof("%s msg body:%s value:%T %s", clientID, msg.GetData(), msg.Value, msg.Value)
// Accept message
msg.Accept()
atomic.AddInt64(&i, 1)
if atomic.LoadInt64(&i) > int64(b.N) {
//log.Info("return")
return
}
}
}

func BenchmarkMqttSubscriber(b *testing.B) {
opt := mqtt.NewClientOptions().SetClientID("subClient").SetCleanSession(false)
opt.AddBroker("tcp://127.0.0.1:1883")
client := mqtt.NewClient(opt)
t := client.Connect()
if t.Wait() {
err := t.Error()
if err != nil {
log.Fatal(err)
return
}
}
defer func() {
client.Disconnect(1000)
}()

ctx, cancel := context.WithTimeout(context.Background(), 100*time.Second)
defer cancel()

b.N = subMsgCount
b.ReportAllocs()
b.ResetTimer()
defer b.StopTimer()
var i int64 = 0

go func() {
for range time.Tick(time.Second) {
if atomic.LoadInt64(&i) >= int64(b.N) {
cancel()
}
}
}()
client.Subscribe(mqttDestination, 2, func(c mqtt.Client, m mqtt.Message) {
//log.Infof("%s msg body:%s", "1", m.Payload())
m.Ack()
atomic.AddInt64(&i, 1)
if atomic.LoadInt64(&i) > int64(b.N) {
//log.Info("return")
return
}
})
select {
case <-ctx.Done():
break
}
log.Info("close sub")
}

一些细节行为

官方的FAQ里面写了一些实现的细节

  1. 如果producer比较快而consumer比较慢的话, ActiveMQ的流量控制功能使得producer阻塞. http://activemq.apache.org/what-happens-with-a-fast-producer-and-slow-consumer.html
  2. 不支持消费者拿到消息之后Requeue, 即不支持像NSQ那样的消费者出现业务逻辑错误后重试.http://activemq.apache.org/how-do-i-unack-the-message-with-stomp.html. 但是可以利用延时消息实现类似的功能.

性能调优

  1. 如果使用了virtualTopic, 那么默认配置下, virtualTopic对应的Queue越多, 发送越慢, 因为默认virtualTopic转发到queue是串行的, 需要调整concurrentSend=true启用并发发送到queue.

    https://activemq.apache.org/virtual-destinations
    https://issues.jboss.org/browse/ENTMQ-1093
    https://github.com/apache/activemq/blob/9abe2c6f97c92fc99c5a2ef02846f62002a671cf/activemq-broker/src/main/java/org/apache/activemq/broker/region/virtual/VirtualTopicInterceptor.java#L87

  2. concurrentStoreAndDispatchQueues设置为false. 默认配置下, 这个值是true, 根据文档所说在快速消费者情况下, 此值设置为true可以加快持久化消息的性能, 因为被快速消费了消息可以不用落盘, 但实测发现此值为true则10个producer并发发送和1个producer并发发送的性能是一样的没有提高. 设置为false之后提高producer并发则可获得性能倍速提高, 并且单个producer的发送性能并没有下降.

  3. 启用mKahaDB, ActiveMQ为了减少打开的文件描述符数量, 默认是用一个KahaDB实例来持久化消息, 但是在磁盘性能比较好的情况下, 一个kahaDB实例发挥不出磁盘的潜力, 启用多个kahaDB后性能可以获得倍速增长. 可以按queue名字的pattern来设置多个kahaDB实例, 也可以使用perDestination="true"设置每个queue一个kahaDB实例, 但这个参数也有坑, 如果destination名字超过了42个字符串, 则会被截断, 发送会报不可恢复的错. 可解决的办法是手动分好destination使用的kahadb, 但是这个配置后续不能动态改了, 只能新开Broker然后迁移. 否则会重启后如果分配规则改变导致分配到了不同的kahadb, 则之前的数据不会被消费.

    http://sigreen.github.io/2016/02/10/amq-tuning.html

    https://activemq.apache.org/kahadb#multim-kahadb-persistence-adapter

12…12

hanjm

24 日志
44 标签
RSS
GitHub
Links
  • (一些有趣的博客列表)
    鸟窝
  • taozj
  • feilengcui008
  • lanlingzi
  • cizixs
  • liaoph
  • liyangliang
  • ideawu
  • legendtkl
  • 算法之道
  • surmon
  • shanshanpt
  • zddhub
  • luodw
  • xiaorui
  • TiDB
  • 谢权SELF
  • songjiayang
  • cjting
  • kingname
  • 漠然
  • xiayf
  • 40huo
  • nosuchfield
  • holys
  • icymind
  • hackjutsu
  • 流浪小猫
  • 谢龙
  • Jiajun
  • Weny
  • coldcofe
  • 张俊杰的博客
  • v2fw
  • wudaijun
  • sanyuesha
© 2016 — 2019 hanjm
由 Hexo 强力驱动